Homemade Peanut Butter Cups with Crunchy Quinoa
Highlighted under: Easy Desserts Inspiration
I love making these Homemade Peanut Butter Cups with Crunchy Quinoa on weekends. The combination of creamy peanut butter and crunchy quinoa creates a delightful contrast that I can't resist. It's a fun project to make with friends or family, and the end result is both scrumptious and satisfying. Once I discovered how easy they were to whip up, I couldn’t stop experimenting with different toppings and flavors. These treats are perfect for satisfying my sweet tooth while still feeling indulgent yet healthy.
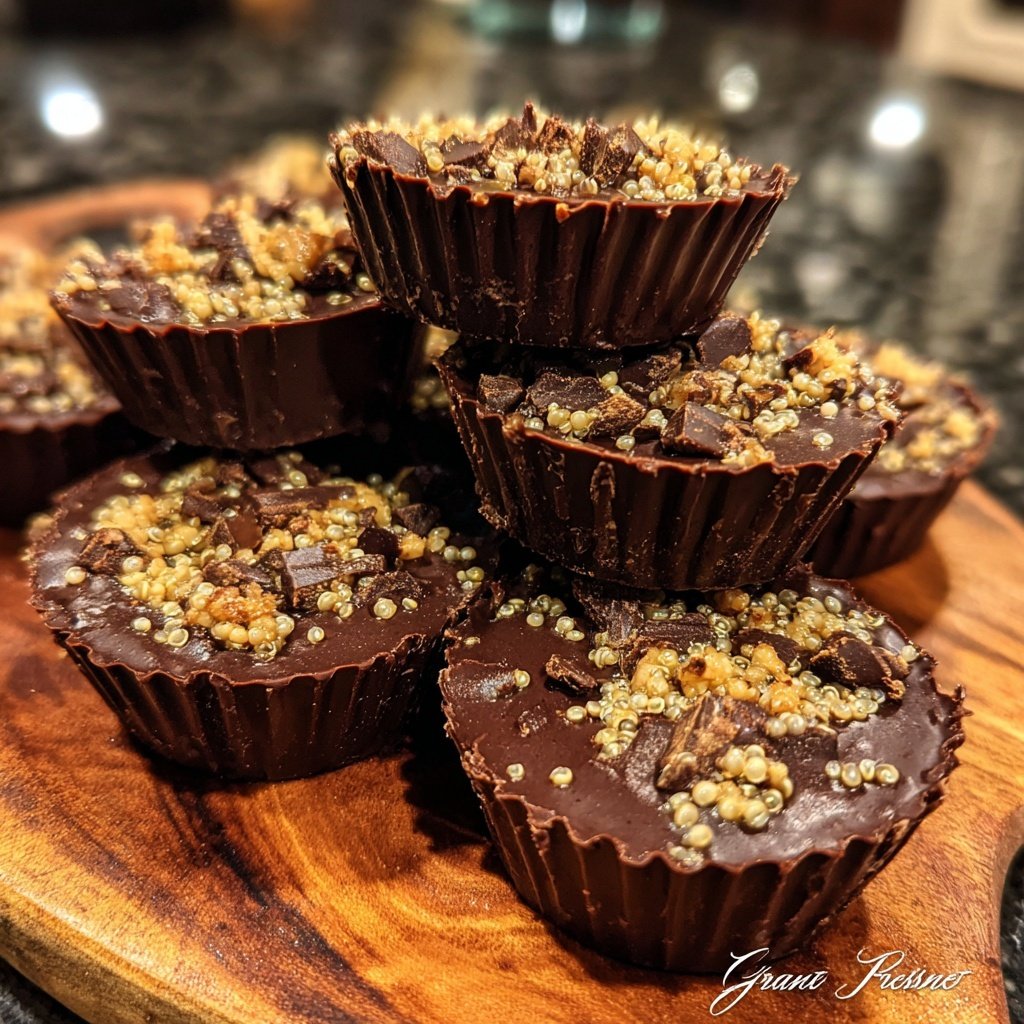
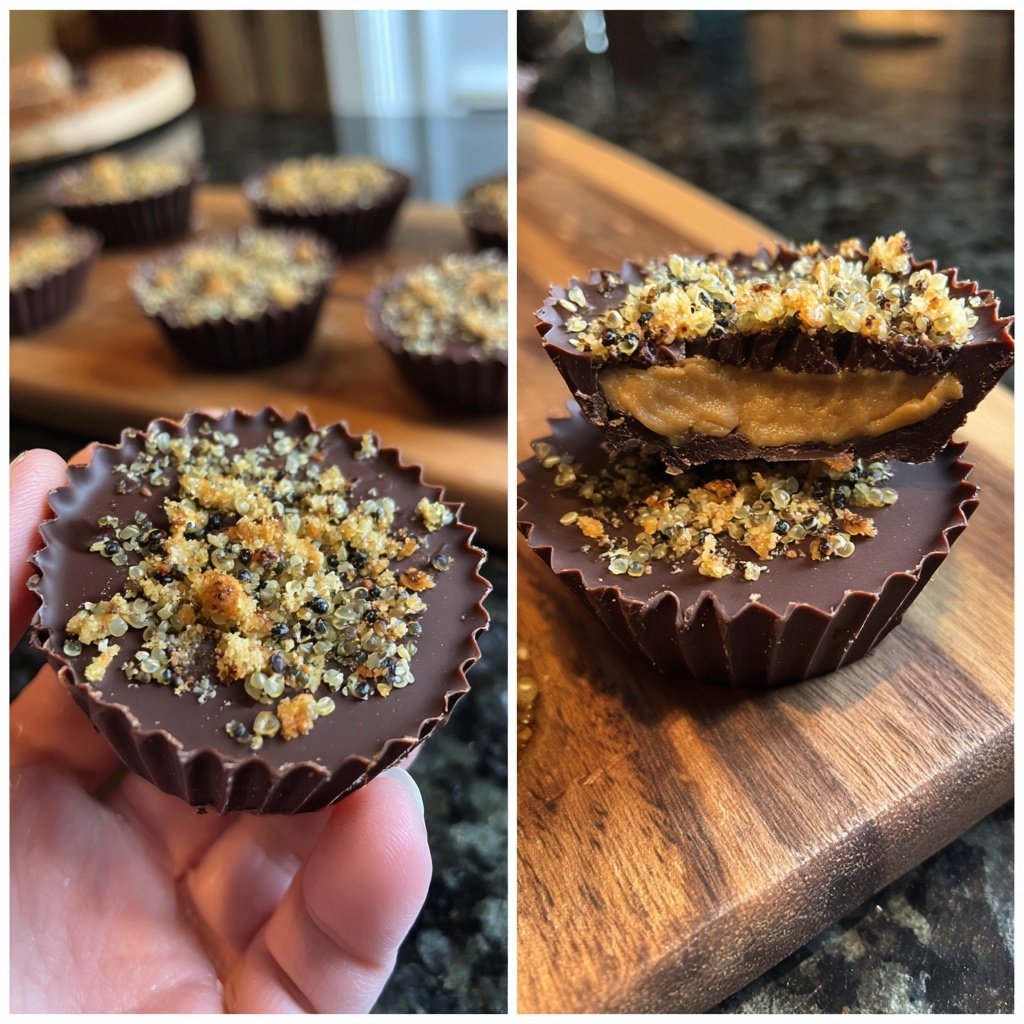
Trying to I make these peanut butter cups, I learned the importance of quality chocolate in creating that rich, smooth coating. Using a high-quality dark chocolate makes all the difference. I remember the first time I added crunchy quinoa; it took the texture to a whole new level! The unexpected crunch paired with the creamy filling adds an enjoyable surprise.
One tip I found essential is to let the molds sit in the fridge for about 10 minutes before adding the peanut butter filling. This helps the chocolate layer set quickly while keeping the cups from melting together. Each time I make these, I discover a new little trick that enhances the overall flavor and texture!
Why You'll Love This Recipe
- Deliciously creamy peanut butter center with a satisfying crunch
- Rich chocolate coating that complements the peanut butter beautifully
- A healthy twist with added fiber and protein from quinoa
Perfecting the Chocolate Coat
The choice of dark chocolate chips significantly influences the flavor of your peanut butter cups. Opting for a quality chocolate with 60-70% cocoa content provides a rich and slightly bitter contrast to the sweetness of the filling. When melting the chocolate, keep an eye on the microwave to prevent scorching. Chocolate should be heated gradually, stirring until it reaches a smooth, glossy consistency. Always start with 30-second increments to maintain control over the melting process.
Using coconut oil in the chocolate serves two purposes: it thins the chocolate slightly, which helps achieve a smoother coating, and it adds a subtle coconut flavor that pairs well with the peanut butter. If you're aiming for a vegan option, ensure your chocolate chips are dairy-free. For added depth, consider sprinkling a pinch of sea salt over the melted chocolate layer before chilling, amplifying the overall flavor experience.
Crafting the Peanut Butter Filling
For the peanut butter filling, selecting a natural, creamy peanut butter is key to achieving the right texture and taste. Avoid brands with added sugars or hydrogenated oils, as they may result in a greasy filling. Stir the peanut butter vigorously to ensure it's smooth before mixing in the other ingredients. The crispy quinoa not only provides texture but also introduces a delightful crunch that complements the creaminess of the peanut butter beautifully.
When incorporating honey or maple syrup, feel free to adjust the sweetness to your liking. If you prefer a less sweet filling, decrease the amount of sweetener slightly. Also, if you're looking for an additional flavor twist, consider mixing in a dash of cinnamon or a few mini chocolate chips for extra sweetness and visual appeal. This filling is versatile, so don't hesitate to customize it to suit your taste preferences.
Ingredients
For the Chocolate Coating
- 1 cup dark chocolate chips
- 1 tablespoon coconut oil
For the Peanut Butter Filling
- 1 cup creamy natural peanut butter
- 1/4 cup honey or maple syrup
- 1/2 cup crispy quinoa
- 1/2 teaspoon vanilla extract
- A pinch of salt
Notes:
Feel free to substitute the peanut butter with almond or sunflower seed butter for a different flavor.
Instructions
Prepare the Chocolate Coating
In a microwave-safe bowl, combine dark chocolate chips and coconut oil. Heat in 30-second intervals, stirring in between, until melted and smooth.
Mold the Chocolate
Using a spoon, coat the bottoms of a silicone muffin mold with the melted chocolate, making sure to cover the sides as well. Place the mold in the fridge to set for about 10 minutes.
Make the Peanut Butter Filling
In a mixing bowl, combine peanut butter, honey or maple syrup, crispy quinoa, vanilla extract, and salt. Mix until well combined and smooth.
Fill the Molds
Once the chocolate has hardened, remove the mold from the fridge and fill each cup with the peanut butter mixture, leaving a little space at the top.
Top with Chocolate
Spoon the remaining melted chocolate over the peanut butter filling, ensuring it's fully covered. Tap the mold gently to release any air bubbles.
Chill and Serve
Place the filled molds back in the fridge for at least 15 minutes until the chocolate is set. Once firm, gently pop the cups out of the molds and enjoy!
Enjoy!
Store any leftovers in an airtight container in the fridge for up to a week.
Pro Tips
- For an extra layer of flavor, consider adding a sprinkle of sea salt on top of the chocolate before it sets.
Storage Tips
These homemade peanut butter cups can be stored in an airtight container in the fridge for up to two weeks, making them a great treat to have on hand for whenever a sweet craving strikes. If you’re planning to keep them longer, consider freezing them. Simply layer the cups between sheets of parchment paper in a freezer-safe container to prevent sticking. They can last several months in the freezer, but allow them to thaw for about 10 minutes at room temperature before enjoying.
When ready to serve, you can elevate these peanut butter cups by garnishing with a sprinkle of flaky sea salt or crushed nuts to enhance both flavor and presentation. If left at room temperature for extended periods, the chocolate may soften, so it's best to serve them chilled for that perfect bite.
Variations to Try
Experimenting with different nut butters can bring exciting variations to this recipe. Almond butter or cashew butter can offer unique flavor profiles, each lending a distinct twist to the classic peanut butter cup experience. If you're feeling adventurous, you could try adding a layer of fruit preserves or jam between the filling and the chocolate for a fruity surprise.
For a more decadent treat, consider mixing in toppings such as shredded coconut, crushed pretzels, or even sprinkles before the final chocolate layer sets. These additions can add extra layers of flavor and texture, making each bite even more enjoyable. You could also drizzle melted white chocolate over the top for a beautiful contrast and extra sweetness.
Questions About Recipes
→ Can I use milk chocolate instead of dark chocolate?
Yes, you can substitute milk chocolate, but it will change the flavor profile and make it sweeter.
→ How can I make these vegan?
Use dairy-free chocolate chips and maple syrup as a sweetener.
→ Can I store these at room temperature?
While they can sit at room temperature, they're best kept in the fridge to maintain their firm texture.
→ What can I substitute for quinoa?
You can use crushed nuts or seeds for a similar crunchy texture.
Homemade Peanut Butter Cups with Crunchy Quinoa
Created by: Nicola Fairchild
Recipe Type: Easy Desserts Inspiration
Skill Level: Easy
Final Quantity: 12 cups
What You'll Need
For the Chocolate Coating
- 1 cup dark chocolate chips
- 1 tablespoon coconut oil
For the Peanut Butter Filling
- 1 cup creamy natural peanut butter
- 1/4 cup honey or maple syrup
- 1/2 cup crispy quinoa
- 1/2 teaspoon vanilla extract
- A pinch of salt
How-To Steps
In a microwave-safe bowl, combine dark chocolate chips and coconut oil. Heat in 30-second intervals, stirring in between, until melted and smooth.
Using a spoon, coat the bottoms of a silicone muffin mold with the melted chocolate, making sure to cover the sides as well. Place the mold in the fridge to set for about 10 minutes.
In a mixing bowl, combine peanut butter, honey or maple syrup, crispy quinoa, vanilla extract, and salt. Mix until well combined and smooth.
Once the chocolate has hardened, remove the mold from the fridge and fill each cup with the peanut butter mixture, leaving a little space at the top.
Spoon the remaining melted chocolate over the peanut butter filling, ensuring it's fully covered. Tap the mold gently to release any air bubbles.
Place the filled molds back in the fridge for at least 15 minutes until the chocolate is set. Once firm, gently pop the cups out of the molds and enjoy!
Extra Tips
- For an extra layer of flavor, consider adding a sprinkle of sea salt on top of the chocolate before it sets.
Nutritional Breakdown (Per Serving)
- Calories: 200 kcal
- Total Fat: 14g
- Saturated Fat: 4g
- Cholesterol: 0mg
- Sodium: 75mg
- Total Carbohydrates: 19g
- Dietary Fiber: 2g
- Sugars: 10g
- Protein: 5g